Saving a File for Print
01
 Photoshop
IMPORTANT: SAVING A FILE FOR PRINT
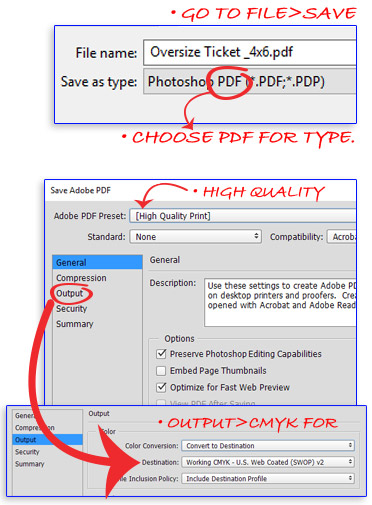
- Go to File > Save As. The Dialogue box will open.
- Name your File, Choose Photoshop PDF and click Save.
- Preset: High Quality Print
- Go to Output tab, then choose Convert to Desination and make sure it's in "Working CMYK."
02
 Illustrator
IMPORTANT: SAVING A FILE FOR PRINT
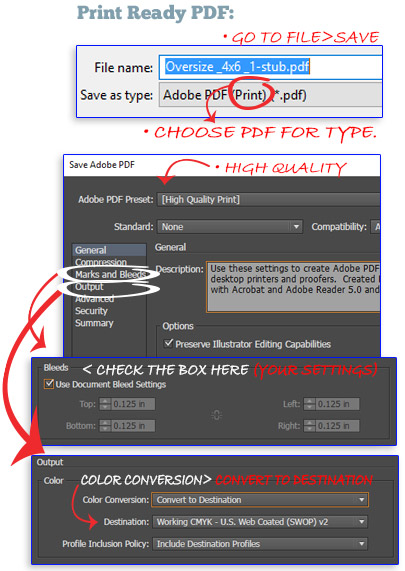
- Create Outlines for type. Select all fonts, Go to Type > Create Outlines.
- Go to File > Save As. The Dialogue box will open.
- Name your File, Choose Adobe PDF and click Save.
- Preset: High Quality Print
- Check the box for bleed settings .125
- Convert to destination, make sure it's in "Working CMYK - (SWOP)."
03
 InDesign
IMPORTANT: SAVING A FILE FOR PRINT
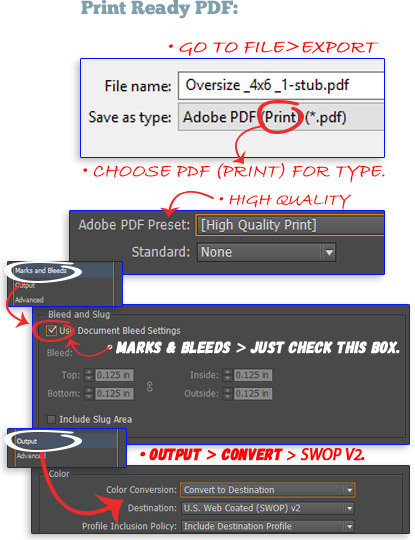
- Go to File > Export. The Dialogue box will open.
- Name your File, Choose PDF (print) and click Save.
- Preset: High Quality Print
- Go to Output Tab, then choose Convert to Destination, and make sure it's in "(SWOP)."
- Go to Marks & Bleed tab, check bux "Use Doc Bleed Settings". (.125)
04
 Quark
Quark
SAVING A PRINT FILE with QUARK
- Go to File > Save As. The Dialogue box will open.
- Name your File, Choose PDF (print) and click Save.
- Go to File > Save As. The Dialogue box will open.
- Name your File, Choose PDF (print) and click Save.
05
 Corel
Corel
SAVING A PRINT FILE with COREL
- Go to File > Save As. The Dialogue box will open.
- Name your File, Choose PDF (print) and click Save.
06
 Word
Word
SAVING A PRINT FILE with Word
- Go to Save As > Adobe PDF. The Dialogue box will open.
- Name your File, Set Type as PDF Files and click Save.
- Go to File > Save As. The Dialogue box will open.
- Name your File, Set Format to PDF and click Publish.
07
 Pub
Pub
SAVING A PRINT FILE with Publisher
- Go to Save As > Adobe PDF. The Dialogue box will open.
- Name your File, Set Type as PDF Files and click Save.
 Photoshop

 Illustrator

 InDesign

 Quark
Quark
 Corel
Corel
 Word
Word
 Pub
Pub